Explore Linux Kernel Programming with QEMU
The objective of this post is to show how to compile the linux kernel and execute it within an environment virtualized with QEMU.
This is extremely useful when you want to poke around in the kernel in a controlled environment. At the end of the post I will show how to load a simple "Hello World" module into the kernel using the Loadable Kernel Module (LKM) technology.
Hope the read is enjoyable and have fun!
We will break down the topic into four different sections:
- First we download and compile the sources of the
linux kernel. - Then we build a minimal file system that will be mounted during the boot process.
- Then we run the virtual machine with
QEMU. - Finally, we show how to compile a simple kernel module and how to load it in the live image of the kernel.
Compile kernel source#
First we download the sources of the kernel. Say, for example, that we want to download kernel version 4.19.320
wget https://cdn.kernel.org/pub/linux/kernel/v4.x/linux-4.19.320.tar.xz
tar -xvf linux-4.19.320.tar.xz
cd linux-4.19.320
In general you can find the various versions of the kernel in the following link:
We start by generating a configuration file.
make defconfig # generate initial configSince the kernel has a lot of different options, it is necessary to generate a configuration that targets specifically QEMU. For older kernel versions this can be done with the kvmconfig target, while for recent ones the kvm_guest.config can be used.
make kvmconfig          # for older versions
make kvm_guest.config   # for recent versions
Sometimes you might need to modify certain flags in the generated configuration file. For example, if you want to use symbols debug information, you have to change the value for CONFIG_DEBUG_INFO as follows.
# Debug info for symbolization.
CONFIG_DEBUG_INFO=y
If you modify it, afterwards execute the olddefconfig target
make olddefconfigAt this point you're ready to compile it!
make -j$(nproc)After compilation is over, you should find the following file in the directory.
$ ls -lha linux-4.19.320/arch/x86_64/boot/bzImage
lrwxrwxrwx 1 leo leo 22 Sep  7 20:18 linux-4.19.320/arch/x86_64/boot/bzImage -> ../../x86/boot/bzImage
Build a Simple File System#
To actually run the kernel, you will need a basic file system. There are multiple technologies you can use to do this, depending on how minimal you want to be.
initramfsThis is the most minimal approach, and is the one we will use. That is, we build a really minimal file system that contains the bare minimum to have a shell working. Initramfs stands for "Initial RAM file system", and it is the file system that the linux kernel directly loads into memory in order to mount the long-term file system. After the system has been copied into memory, the kernel executes theinitcommand.debootstrapThere is also another way, documented in one of the scripts of the syzkaller project, which bootstraps a more complete debian enviroment.
To build a simple initramfs, start by creating the basic directories which will contain our barebone file system.
mkdir -p initramfs/{bin,etc,usr}
mkdir -p initramfs/etc/init.d
Create then the file etc/inittab with the following content
::sysinit:/etc/init.d/rcS
::once:-sh -c 'cat /etc/motd; setuidgid 0 /bin/sh; poweroff'
And the file init.d/rcS with the following content
#!/bin/sh

/bin/busybox --install -s

stty raw -echo

chown -R 0:0 /

mkdir -p /proc && mount -t proc none /proc
mkdir -p /sys && mount -t sysfs none /sys
mkdir -p /dev  && mount -t devtmpfs devtmpfs /dev
mkdir -p /tmp  && mount -t tmpfs tmpfs /tmp
Make sure to make the file executable
chmod +x etc/init.d/rcSFeel free to put in etc/motd a message of the day of your liking
  ___ ___         .__  .__            ____  __.                         .__
 /   |   \   ____ |  | |  |   ____   |    |/ _|___________  ____   ____ |  |
/    ~    \_/ __ \|  | |  |  /  _ \  |      <_/ __ \_  __ \/    \_/ __ \|  |
\    Y    /\  ___/|  |_|  |_(  <_> ) |    |  \  ___/|  | \/   |  \  ___/|  |__
 \___|_  /  \___  >____/____/\____/  |____|__ \___  >__|  |___|  /\___  >____/
       \/       \/                           \/   \/           \/     \/
Notice how in the rcS we are calling the busybox tool. Now its time to download it and compile it. First, try to execute the following. If it works, you're good to go.
wget https://busybox.net/downloads/busybox-1.36.1.tar.bz2
tar -xvf busybox-1.36.1.tar.bz2
cd ./busybox-1.36.1
make defconfig
LDFLAGS="--static" make CONFIG_PREFIX=./../initramfs -j$(nproc) install
Otherwise, if you cannot build it because your current environment is not compatible with busybox building process (either for your kernel version or for your glibc version), then you can create a custom docker image and build it there.
Start with the following Dockerfile
FROM debian:10.8-slim

RUN apt-get update
RUN apt-get install -y bc bison build-essential cpio flex wget libelf-dev libncurses-dev libssl-dev
Build the docker image
docker build --no-cache -t busybox-builder .Create a temporary folder to share data from the host to the container and run the docker.
mkdir shared
docker run -ti -v ./shared:/build busybox-builder
You can now once again build it using the previous instruction
cd /tmp
wget https://busybox.net/downloads/busybox-1.36.1.tar.bz2
tar -xvf busybox-1.36.1.tar.bz2
cd ./busybox-1.36.1
make defconfig
LDFLAGS="--static" make CONFIG_PREFIX=/build -j$(nproc) install
Once you have built busybox, you can install it within the initramfs by copying the file from the shared folder to the initramfs directory.
cp -r ./shared/* ./../initramfs
sudo chown leo:leo -R ./../initramfs
Finally, enter within initramfs and rename the linuxrc to init.
cd ./../initramfs
mv linuxrc init
At this point the situation within the initramfs folder should be the following one
tree -L 3
.
├── bin
│   ├── arch -> busybox
│   ├── ash -> busybox
│   ├── base64 -> busybox
│   ├── busybox
...
├── etc
│   ├── motd
│   ├── init.d
│   │   └── rcS
│   └── inittab
├── init -> bin/busybox
├── sbin
│   ├── acpid -> ../bin/busybox
│   ├── adjtimex -> ../bin/busybox
│   ├── arp -> ../bin/busybox
│   ├── blkid -> ../bin/busybox
...
└── usr
    ├── bin
    │   ├── [ -> ../../bin/busybox
    │   ├── [[ -> ../../bin/busybox
...
    └── sbin
        ├── addgroup -> ../../bin/busybox
        ├── add-shell -> ../../bin/busybox
...
You are now ready to compress your file system. To do this, execute cpio to obtain the .cpio file, and then archive it with gzip.
find . -print0 | cpio --null -ov --format=newc > initramfs.cpio
gzip ./initramfs.cpio
cp ./initramfs.cpio.gz ./../
At the end you should have a relatively small file initramfs.cpio.gz. This is what we will give to QEMU to boot the kernel.
$ ls -lha initramfs.cpio.gz
-rw-rw-r-- 1 leo leo 623K Sep  9 17:10 initramfs.cpio.gz
Run QEMU#
Let's recap what we did in the previous steps:
- First, we built the linux kernel source code to obtain the
bzImageimage file. - Then, we created an
initramfswith a minimal file system, which is contained within the fileinitramfs.cpio.gz
At this point we have everything we need to run a working virtual machine with QEMU. To do this you can use the following command
qemu-system-x86_64 \
        -m 2G \
        -smp 2 \
        -kernel ./linux-4.19.320/arch/x86/boot/bzImage \
	-initrd ./initramfs.cpio.gz \
        -enable-kvm \
        -nographic \
        -pidfile vm.pid \
	-append "console=ttyS0 root=/dev/sda earlyprintk=serial net.ifnames=0 nokaslr" \
        2>&1 | tee ./logs/vm.log
Notice the arguments used:
-kernelcontains the path to the kernel image obtained through compilation.-initrdcontains the built initramfs.-appendcontains the arguments to be given to the kernel. For example thenokaslrtranslates to disabling KASLR. That is, disabling the randomization of kernel space addresses. This might be useful to test certain security vulnerabilities in a more controlled environment.- The
teecommand is used to log the output of the machine within the file./logs/vm.log. You can also remove this last part.
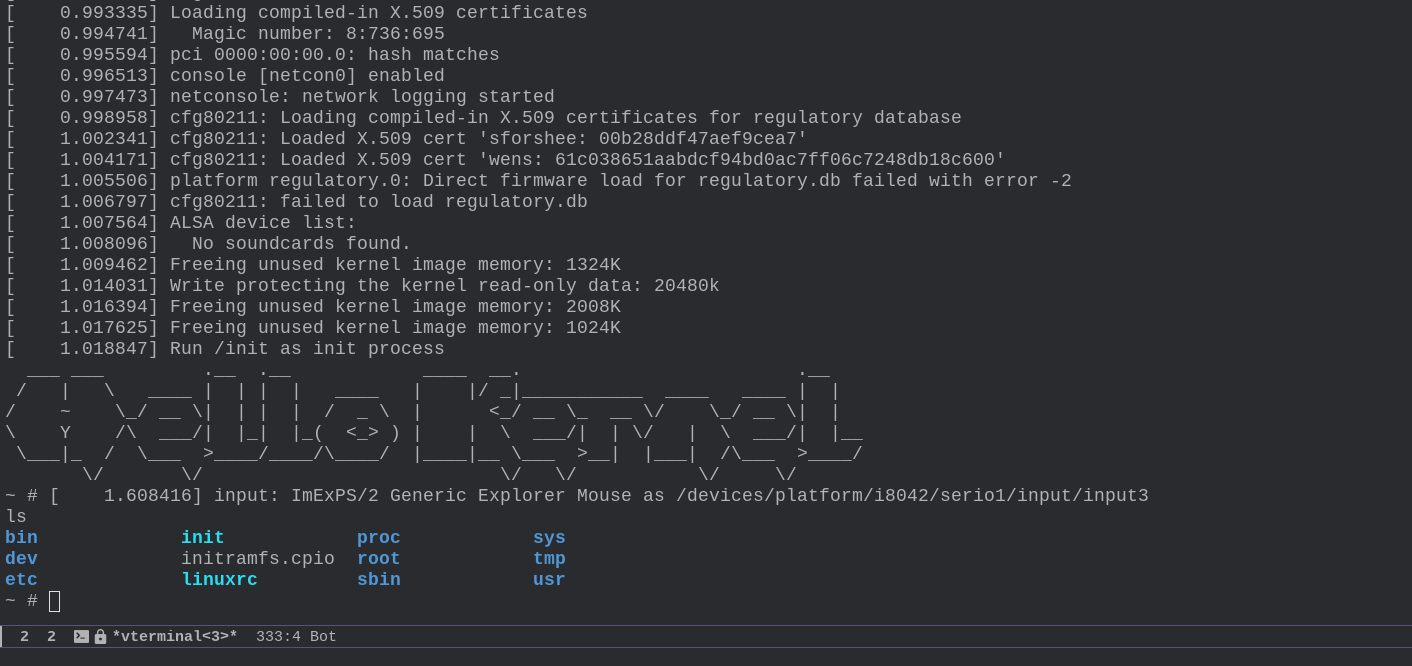
Once you execute the command, you should look at something like the following
Load Kernel module#
At this point we have loaded an official kernel image with a minimal file system. This is where the fun part comes. Now we can load into the system custom kernel modules in order to experiment with whathever kernel APIs we want to poke at.
To do this, consider the following code, which implements a very simple hello world kernel module. This module just logs a string and quits. Very simple indeed!
#include <linux/module.h>	/* Needed by all modules */
#include <linux/kernel.h>	/* Needed for KERN_INFO */

MODULE_LICENSE("GPL");
MODULE_AUTHOR("Leonardo Tamiano");

int init_module(void) {
  printk(KERN_INFO "Hello world\n");
  return 0;
}

void cleanup_module(void) {
  printk(KERN_INFO "Goodbye world\n");
}
We can compile the module to obtain the kernel object (.ko) using the following Makefile. Remember to change the absolute path into the one valid for your own system. For example, my path was /home/leo/projects/PROGRAMMING/lkm-examples/kernels/linux-4.19.320
obj-m += hello.o

all:
        make -C <ABSOLUTE-PATH-TO-LINUX-4.19.320-SOURCES> M=$(PWD) modules

clean:
        make -C <ABSOLUTE-PATH-TO-LINUX-4.19.320-SOURCES> M=$(PWD) clean
Once this is set, you can execute make and it will compile
[leo@arch hello]$ make
make -C /home/leo/projects/PROGRAMMING/lkm-examples/kernels/linux-4.19.320 M=/home/leo/projects/PROGRAMMING/lkm-examples/modules/hello modules
  CC [M]  /home/leo/projects/PROGRAMMING/lkm-examples/modules/hello/hello.o
  Building modules, stage 2.
  MODPOST 1 modules
  CC      /home/leo/projects/PROGRAMMING/lkm-examples/modules/hello/hello.mod.o
  LD [M]  /home/leo/projects/PROGRAMMING/lkm-examples/modules/hello/hello.ko
At this point you have access to the hello.ko. The idea now is to rebuild the initramfs, but this time you will include the new kernel object within the file system.
cp hello.ko ./../initramfs
cd ./../initramfs
find . -print0 | cpio --null -ov --format=newc > initramfs.cpio
gzip ./initramfs.cpio
cp ./initramfs.cpio.gz ./../
Execute once again the same QEMU command, and now once inside you should see the new hello.ko. To load the kernel module you can use insmod as follows
insmod ./hello.koand you should see
~ # insmod ./hello.ko
[   53.040888] hello: loading out-of-tree module taints kernel.
[   53.043534] Hello world
At this point you can check out the list of modules loaded within the file /proc/modules
~ # cat /proc/modules
hello 16384 0 - Live 0xffffffffc0000000 (O)
You can also check out dmesg to check that the message has been logged
~ # dmesg
...
[   53.040888] hello: loading out-of-tree module taints kernel.
[   53.043534] Hello world
Finally, unload the module with rmmod
~ # rmmod hello
[  128.735929] Goodbye world
And that's it. Doing all these steps by hand is kinda boring, but now that you know every single steps, you can start to write your own automation.
Have fun exploring kernel land!
References#
I thank the author of the following resources, which together have helped me to write this blog post. Also, shoutout to my friend claudio who answered some questions I had regarding initramfs.
- https://vccolombo.github.io/cybersecurity/linux-kernel-qemu-setup/
- https://medium.com/@kiky.tokamuro/creating-initramfs-5cca9b524b5a
- https://github.com/vzaccaria/linux-kernel-playground/blob/master/scripts/build-k.sh
- https://github.com/google/syzkaller/blob/master/tools/create-image.sh
- https://mgalgs.io/2021/03/23/how-to-build-a-custom-linux-kernel-for-qemu-using-docker.html